

How To Add Repin Button To Blog
Getting traffic to your blog involves more than just pinning an image to Pinterest. There are 4 critical steps to follow if you want your pins to be seen, and more importantly, clicked through to your content. Today I'm going to walk you through the exact Pinterest repin strategy I used to take my Pinterest views from 0 to 175K per month in 2020.
This post may contain affiliate links or links to Amazon. As an Amazon Associate I earn from qualifying purchases. All this means is that I make a small commission at no extra cost to you! See my disclosure for details.
Why Pinterest?
Pinterest is a visual search engine. Users scroll through images called pins to find what they are looking for.
Users can search by keywords for their interests and needs. Pinterest will then suggest content based on these terms. Pinterest will also suggest content based on the pins they have saved or clicked in the past.
No matter what you offer, Pinterest is an amazing tool for getting traffic to your blog. Pinterest has millions of users searching for content like yours every day.
So how do you get them to see your pins? How can you stand out among the rest?
Pinning an image once is not enough. Each pin needs to be "re-pinned" multiple times to get maximum visibility. This process can be very confusing to new Pinterest users.
This post will break down the 4 steps I have used to grow my Pinterest account and more importantly, increase my blog traffic by over 4,000%.
I have been following this Pinterest repin strategy since November 2019. In October 2019 I had 115 page views on my blog. My February page views are already at 4,937 and there are still 3 days left in the month.

Want explosive growth like mine? Here are the 4 steps to take, from the first pin forward.
Step 1 – Pin Your Image From Your Blog
There are many ways to pin an image to Pinterest. The best is to pin an image embedded in your blog post.
Pin Image Specifications
Pinterest images should be created in a 2:3 ratio. The optimal size for 2020 is 1000 pixels wide by 1500 pixels high. You can create images for free in Canva and download them to your computer as a png file.
Do not upload your image to Pinterest through Canva. I know there is an option for that, but it is not recommended. Download to your computer and then upload it to your blog.
Add a Description
Your embedded pin should be optimized with HTML code that includes a Pinterest-ready description. I wrote a post about how to add this code and optimize your blog for Pinterest that you can (and should) reference if this is new to you.
You can add the code manually through the WordPress editor. If you prefer not to alter the code, you can use the TastyPins plugin. There is a small annual fee for this plugin but it's worth it if you are concerned with breaking your site.
Pin It
Once your pin image is uploaded to your blog and optimized with a description, you will "pin it" using your Pin It button or your sharing plugin of choice. If you need to know how to set these up this post will show you how.
You should always pin your image to your most relevant board first. This board should be yours, not a group board. It should also be optimized with keywords that match your pin description.

Want to know how to create boards and optimize them for Pinterest SEO? This post walks you through it step by step. It covers pin descriptions as well.
Once you pin the image, make sure to check it on Pinterest. Make sure the pin title and description transferred over from your blog. If not, click the pencil icon in the top left corner of the pin and edit it.
This first pin will be shown to your followers first. Pinterest favors new content and images to keep users coming back frequently. They want users to always find something new. This is great for our repin strategy.
Step 2 – Share Your New Pin To Your Facebook Share Groups
Now that your new pin is live on Pinterest, we want to give it a boost. Facebook share groups are set up for bloggers to support each other's new content.
Share groups vary in the content you can share daily, but there are a few that have daily share threads for Pinterest pins. Three of my favorites are Pinfinite Traffic for Bloggers, Pinterest Pals and Bloggers Unite on Pinterest.

All 3 groups offer daily Pinterest threads that encourage repins and clickthroughs 7 days a week. This is key because the strategy involves pinning one new pin every day. Remember how Pinterest favors new content?
You Get What You Give
Copy the URL of your new pin and participate in the daily threads. They will require you to either click through a pin or repin a set number of pins. Remember not to repin any images that do not fit your niche. That can hurt your account by confusing Pinterest as to what you offer, and we don't want to do that.
By participating in these 3 threads alone, my new pins typically get 15 saves and 30 clickthroughs on their first day. This shows Pinterest that my pins are good and encourages the algorithm to show them to more users.
Want the list of my 8 favorite share groups with clickable links to join them? Grab it here as my gift to you. No email required.
Step 3 – Set Up A Repin Schedule
According to the new Pinterest best practices for 2020, you should not repin your image to more than 10 relevant boards. "Relevant" is the key here. You should never repin an image to a board that is not relevant.

You have the choice of using a manual pinning strategy or a Pinterest scheduler. The only Pinterest-approved scheduler is Tailwind. Just know that this scheduling step doesn't require Tailwind, but it sure makes it easier.
Tailwind Strategy
You will want to schedule your pins to repin to relevant boards over the next few days. Always space them out and never repin the same pin back to back. That is considered spam and it will get your account flagged and possibly shut down.
Tailwind makes scheduling easy. Simply enter up to 9 relevant boards for your pin and use the "interval" button on the bottom left to space them out. I recommend setting them one day apart, but the timing is up to you.
Tailwind will warn you if you are scheduling the same pin back to back. It will also warn you if your schedule goes against Pinterest's best practices. This is very helpful to new bloggers who are just getting started.
![]()
When you are new, 80% of the content you repin will not be yours. You don't have enough to fill your boards or your calendar. Once you are more established, that percentage will flip.
I set my schedule to send out 20 pins throughout the day. This ensures that my pins will not be sent out back to back and that I am active on Pinterest frequently, even if I take the day off.
Manual Strategy
If you are not using Tailwind, you will need to repin directly from your blog to your other 9 boards each day. I recommend using Trello or a paper calendar to keep track.

You cannot repin your own pins from Pinterest to other boards. This is considered spam. In Step 4 I will show you how to repin copies of your pins on Pinterest, which is different and allowed.
Want to try Tailwind and see how it works? You can get 100 scheduled pins free here and see which method fits best for you. I use a combination of scheduled pinning and manual as you'll see in Step 4.
Step 4 – Pinterest Repin Strategy For Older Pins
Pinterest likesyou (not just your scheduler) to be active on the platform multiple times a day. Thanks to share groups, I have a lot of content to repin from other bloggers. Now I need to find my own content and recirculate it.
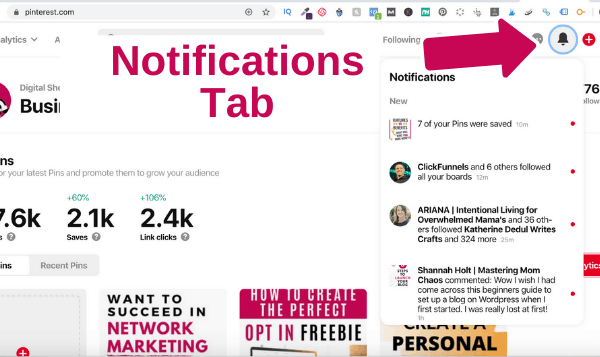
The Pinterest Notifications tab is so useful for finding my pins. As you can see in the image, the Notifications tab is in the top right of the screen and looks like a bell. This dropdown will show you who has followed you recently, who has commented on your pins and who has saved them.
Here I am looking for pins that are older than 14 days. This means that they are out of my rotation on Tailwind (or a manual calendar) and ready to be repinned to my own boards or relevant group boards.
Every repin creates a new pin URL on Pinterest. Pinterest doesn't want us repining our own pins, but they do not have an issue with us repining other's pins – even if they were ours in the first place.
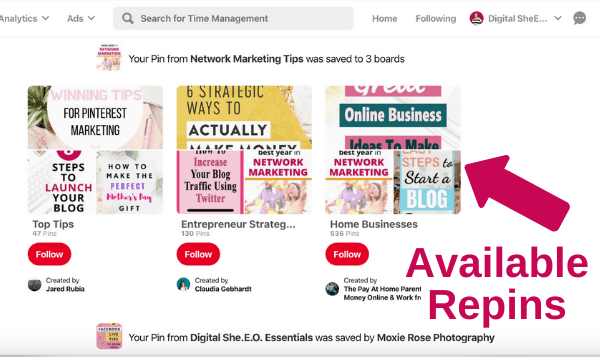
Take a look at this example. I searched my Notifications and found that my pin had been repinned to multiple user's boards. Notice how the same pin has two different URLs. These are different pins to Pinterest.
A good way to check if the pin is yours or not is to look at the bottom of the pin. My account information is up top with the pin title and description. The user who pinned my image is listed at the bottom. See Claudia's account info at the bottom of the first image?
I will then check to make sure my title and description are on the pin and that Claudia has pinned it to a board relevant to my content. It is not worth the repin if it's on a board that doesn't match up because it can confuse Pinterest (and we still don't want that!).
It's all good, so I will repin her pin to a relevant board. This will make another copy and release it back into the feed for more visibility.
I will also pin the second pin for the same reasons, but to another board. These I will spread these out a day apart as I do with Tailwind. I still do not want to pin the pin back to back, even if it has a different URL. Both lead back to the same blog post and I err on the side of caution.
Pro Tip:
If it hasn't quite been 14 days yet, or if I have a lot of great copies I could repin, I will make a copy of the pin URLs and put them in a Google Doc. I always keep a list of URLs to post to relevant boards for times that I am busy or when I can't find older content to share.
Ready To Put This Pinterest Repin Strategy To Use?
I hope you are! I am still shocked at the growth in both my Pinterest account and my blog traffic since I put these 4 steps in practice.
Pinterest may seem confusing at first, but once you get the hang of it, you will wish you started sooner. I have so many resources on this blog to help you optimize your Pinterest business account and get more traffic to your blog.
Check out the recommended posts below or use the Marketing and Visibility tab up top to search all of the Pinterest content. Happy Pinning and reach out if you have questions. You can always find me in my Facebook share group, Pinfinite Traffic for Bloggers.

How To Add Repin Button To Blog
Source: https://digitalsheeo.com/pinterest-repin-stragegy/
Posted by: williamsontheresobted.blogspot.com
0 Response to "How To Add Repin Button To Blog"
Post a Comment